Mapping a Floating Town
A Tutorial by Dwight Delleva
The tutorial uses the medieval exterior tileset made by Nquisitor. Get the tileset here!
If you can't use Nquisitor's tileset, you can follow the link below.
Read the first part of this tutorial here!
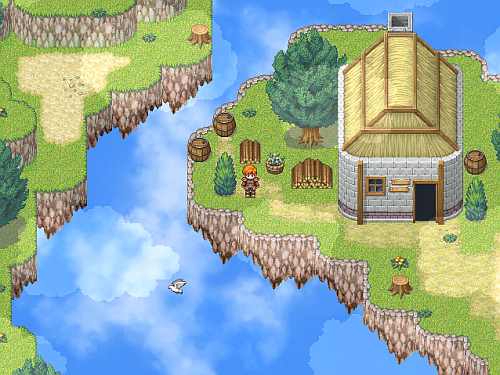
Note: It is advised for you to read the first part of this tutorial so you can edit moutain or cave walls to float in air. Look at the example showing how you can turn a simple farm in earth float in the skies.
Before:
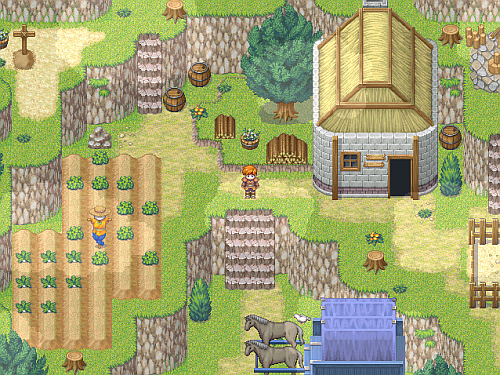
After:
Introduction:
This tutorial will help mappers make a nice floating town. To make a town float in air, you will have to set the background panorama of the tileset to a sky graphic. By making several small islands with houses in one level, you can make an ideal floating town. The islands can be connected using the bridge and the railway in the tileset. You can use the lorry character when riding in the railway. If you have suggestions, tell me so I can improve this tutorial.
Island Base:
Layer 1
For the lower layer, look at the picture below. We can use the pointed rock formation as marked on the left side of the picture for the base of the floating island.
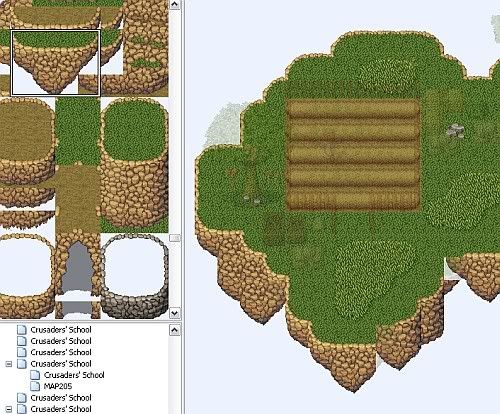
Layer 2
For the middle layer, we can use the tile as marked on the left side of the picture below to cover areas we'll need to cover.
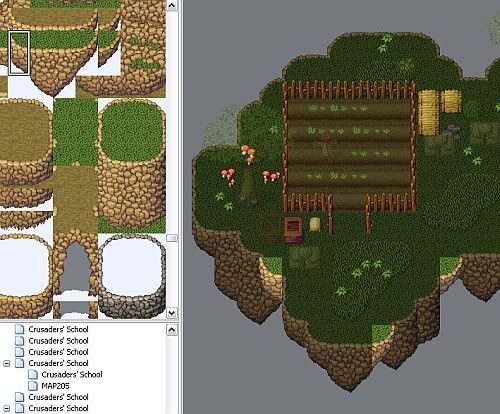
The map (below picture) will look like this. The middle layer will cover the first layer.

Use the Sky as the background panorama. To set the panorama, enter the database and go to the tileset you are using. Click on the panorama box and set the sky graphic. You can also do it by inserting an event anywhere on your map. On the "Change Map Settings" set the panorama to the sky graphic and the trigger to parallel process to make a floating island as shown below.

Inserting Houses:
This section is unnecessary to read if you know how to make houses. Map houses as you normally do. In this tutorial, we can just use the first and second layer for the house so we can use the third layer for the cloud autotile.
Layer 1
We can use the first layer to put on the wall of the house.
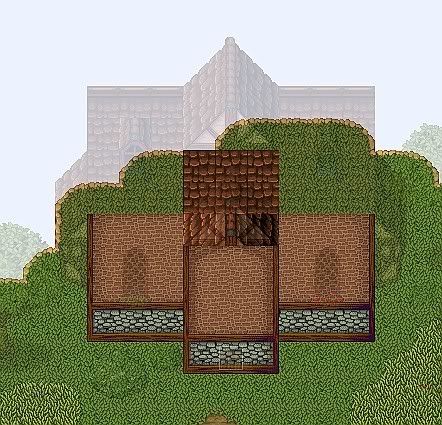
Layer 2
We can use the second layer for the windows and the roof of the house.
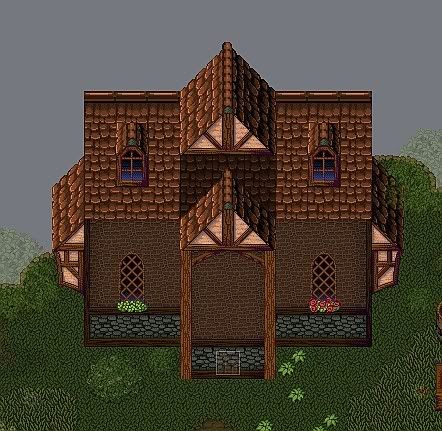
The house (below picture) will look like this during game play.

Layer 3
You can use the third layer for the clouds. You can find the animated cloud autotiles below. Set the priority for the cloud autotile to 5.
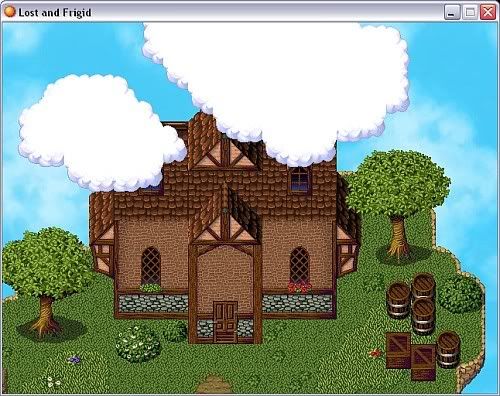
The following animated cloud autotiles are edited by me using the cloud graphic from the heaven exterior tileset. Feel free to use them in your games.


http://img.photobucket.com/albums/v246/ ... Purple.png[/img]

Reaching other Islands:
Because the islands are separated from each other, how can your hero reach areas? You can add an event where your hero can ride on such as a flying creature or a lorry. Download my Airborne Things demo for the flying and landing event you can add for this kind of map or you can just use the bridge in the tileset to connect islands. You can also use a cannon like in the Seiken Densetsu game. Your hero can be placed inside the cannon and someone fires it to launch you flying in air to reach places.


You can use this character with the bridge when you make a bridge formation like what is shown in the picture example.
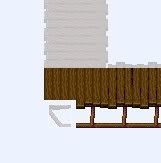
In layer 1, you leave the tile empty where you need put on the character. Insert an event using the bridge character above to make the bridge look like this (below picture) during game play.

Sky-only Levels:
If you want a level set in a place like sky, you can use my modified heaven tileset below. This tileset comes with a translucent rainbow bridge. You can just download my Airborne Things demo so you can find and use my other original resources in the graphics folder such as the animated cloud tree and bush, a bad cupid character holding an arrow, animated rainbow diamonds, another rainbow display, and tornado characters. If you want to download the resources only, follow this link.

Note: Do not right-click and save the picture directly. This is only a preview, instead, click on the picture to see the actual size of the tileset. There is no need to import and set the transparency of this tileset. Just directly copy it on the tileset folder.
This tileset can be used easily because you only use the cloud autotiles for an entire map level. Set the "passability" of the clouds according to your liking. For an example of a sky level, look at he picture below.

End...
A Tutorial by Dwight Delleva
The tutorial uses the medieval exterior tileset made by Nquisitor. Get the tileset here!
If you can't use Nquisitor's tileset, you can follow the link below.
Read the first part of this tutorial here!
Note: It is advised for you to read the first part of this tutorial so you can edit moutain or cave walls to float in air. Look at the example showing how you can turn a simple farm in earth float in the skies.
Before:

After:

Introduction:
This tutorial will help mappers make a nice floating town. To make a town float in air, you will have to set the background panorama of the tileset to a sky graphic. By making several small islands with houses in one level, you can make an ideal floating town. The islands can be connected using the bridge and the railway in the tileset. You can use the lorry character when riding in the railway. If you have suggestions, tell me so I can improve this tutorial.
Island Base:
Layer 1
For the lower layer, look at the picture below. We can use the pointed rock formation as marked on the left side of the picture for the base of the floating island.

Layer 2
For the middle layer, we can use the tile as marked on the left side of the picture below to cover areas we'll need to cover.

The map (below picture) will look like this. The middle layer will cover the first layer.

Use the Sky as the background panorama. To set the panorama, enter the database and go to the tileset you are using. Click on the panorama box and set the sky graphic. You can also do it by inserting an event anywhere on your map. On the "Change Map Settings" set the panorama to the sky graphic and the trigger to parallel process to make a floating island as shown below.

Inserting Houses:
This section is unnecessary to read if you know how to make houses. Map houses as you normally do. In this tutorial, we can just use the first and second layer for the house so we can use the third layer for the cloud autotile.
Layer 1
We can use the first layer to put on the wall of the house.

Layer 2
We can use the second layer for the windows and the roof of the house.

The house (below picture) will look like this during game play.

Layer 3
You can use the third layer for the clouds. You can find the animated cloud autotiles below. Set the priority for the cloud autotile to 5.

The following animated cloud autotiles are edited by me using the cloud graphic from the heaven exterior tileset. Feel free to use them in your games.


http://img.photobucket.com/albums/v246/ ... Purple.png[/img]

Reaching other Islands:
Because the islands are separated from each other, how can your hero reach areas? You can add an event where your hero can ride on such as a flying creature or a lorry. Download my Airborne Things demo for the flying and landing event you can add for this kind of map or you can just use the bridge in the tileset to connect islands. You can also use a cannon like in the Seiken Densetsu game. Your hero can be placed inside the cannon and someone fires it to launch you flying in air to reach places.


You can use this character with the bridge when you make a bridge formation like what is shown in the picture example.

In layer 1, you leave the tile empty where you need put on the character. Insert an event using the bridge character above to make the bridge look like this (below picture) during game play.

Sky-only Levels:
If you want a level set in a place like sky, you can use my modified heaven tileset below. This tileset comes with a translucent rainbow bridge. You can just download my Airborne Things demo so you can find and use my other original resources in the graphics folder such as the animated cloud tree and bush, a bad cupid character holding an arrow, animated rainbow diamonds, another rainbow display, and tornado characters. If you want to download the resources only, follow this link.

Note: Do not right-click and save the picture directly. This is only a preview, instead, click on the picture to see the actual size of the tileset. There is no need to import and set the transparency of this tileset. Just directly copy it on the tileset folder.
This tileset can be used easily because you only use the cloud autotiles for an entire map level. Set the "passability" of the clouds according to your liking. For an example of a sky level, look at he picture below.

End...
