Zekallinos
Sponsor
Hey there. I don't know about you, but the fogs included within the RTP are rather limited. Small, inefficient, not to mention the ridiculous aspect of the fluffy 002-Clouds01.png
Well today I propose a simple way of creating a quick and efficient fog, original, using photoshop. Perhaps some of you already use this, but if you don't, great! If you do not have this all-around software, well...you can always use the one I give here.
So let's start by making a document. File > New... Note, however, two points :
I choose a 2048x2048 document. A 1024x1024 will do just fine, too.
-Go ahead and hit the "D" key. It sets the background and foreground to white and black, respectively.
 Got this? Great.
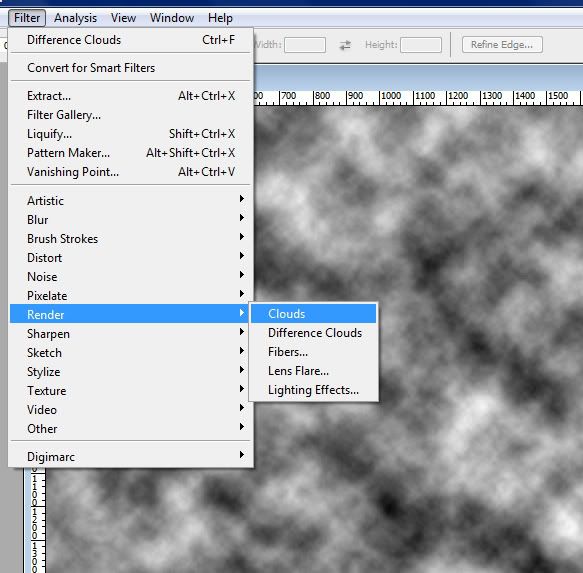
-Go to Filter > Render > Clouds. Like that.
-You shouldn't need to, but I'd advise you to go to Filters > Others > Offset... . Play around with the sliders. Do any seams appear? No? Perfect, you can hit cancel. (Make sure you have "Preview" checked!)
-Hit Render > Difference Clouds either once or thrice. It depends on your personnal preferences. With three times, the clouds will appear a little sharper. I used three. If you feel there are too many white "strings" or "loops", you can always undo (Ctrl-Alt-Z) to render difference clouds again. If you have no idea of what I mean by that, just follow on and ignore.
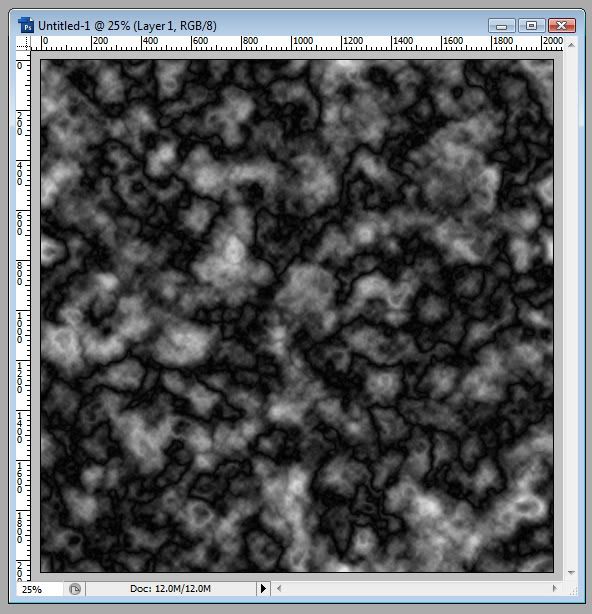
-Doesn't look to good eh? Don't worry, we shall fix this. Go to Image > Adjustements > Levels... . That function puts more emphasis on the either the black, grey, or white part of the image. Just play with the sliders, you'll understand in a second if you didn't already do. Now, move the black arrow rightwards and same for the grey one, but a little less.
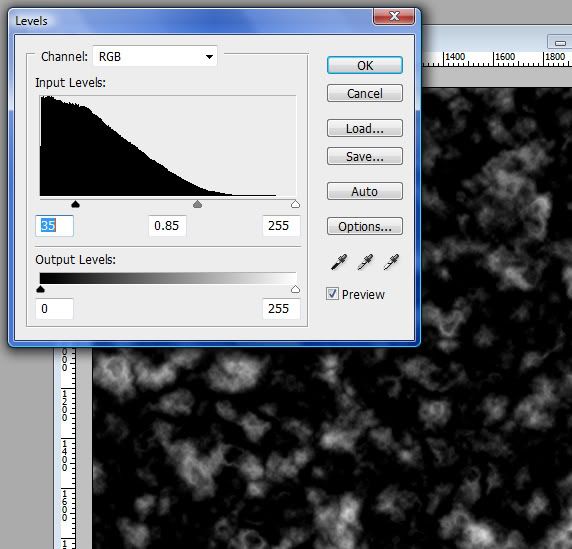
-Those are my configuration. It's really up to you to get what you like though. In short, the black arrow determines the amount of clouds and the grey one, the sharpness of them. You do not need to touch the white one. Here's another possible configuration.
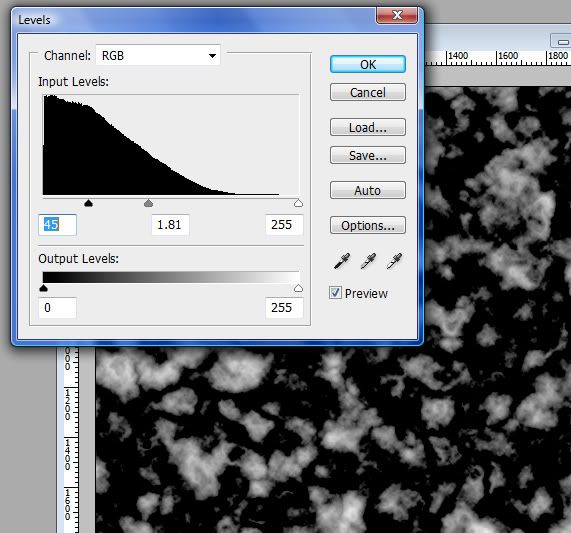
-So then, press OK (obviously). There you go, you have it! Or not, one last thing. Go to Image > Image Size... And shrink your image by half on both width and length (50%). Why you may ask? Cause it's just clouds, you don't need it to be very high resolution. Some blurry shadow overtop of your head (or character) is enough. But then, why not have a smaller size to begin with? Remember, the higher the size, the more clouds are rendered, and you want diversity as much as possible (at least, I do).
-Now just save your file in JPG format, and there you have it!
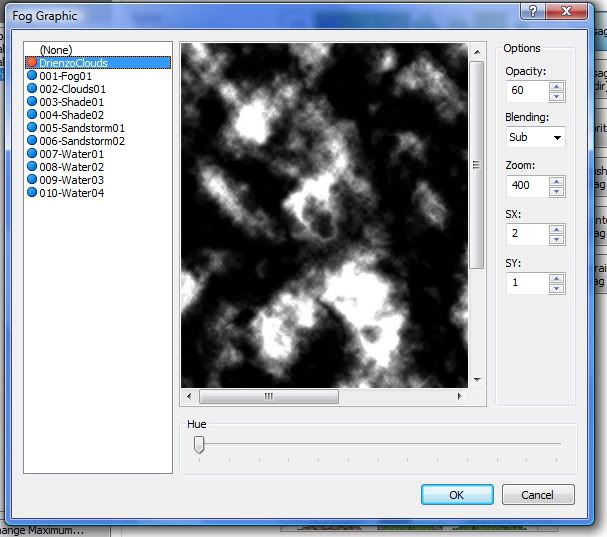
-Now once on RMXP, have the following settings. You may adjust opacity depending on how dark you want the cloud shadows to be. You may have movement or not at all. Zoom it since real clouds are kinda big.
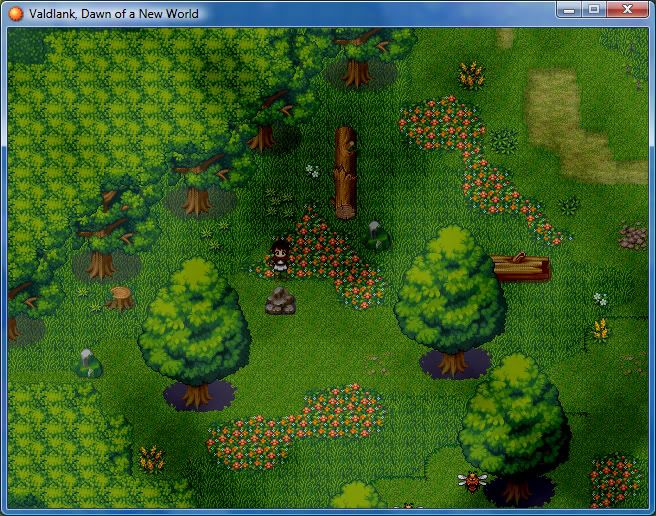
-So there you go! Adjust screen tones if needed.
And if you don't have photoshop, don't be sad, I have made those two for you ^^.
This and this
And remember, you don't need to follow this tutorial exactly as it is, try experimenting with your own settings!
Well today I propose a simple way of creating a quick and efficient fog, original, using photoshop. Perhaps some of you already use this, but if you don't, great! If you do not have this all-around software, well...you can always use the one I give here.
So let's start by making a document. File > New... Note, however, two points :
- It must be a perfect square document whose size if a power of two (256, 512, 1024, 2048, etc). Why is that? Unless you have such sizes, the clouds filter will not tile. Sure, you can use the patch tool or whatever other method to remove the seams, but it will not be as nice as if it was totally flawless to begin with. Not to mention saving time.
- Make it as big as possible. The bigger it is, the less often the same clouds appear and the better. It will, in any case, be a JPG grayscale image, and will not weight much. Naturally, no need to overdo that either.
I choose a 2048x2048 document. A 1024x1024 will do just fine, too.
-Go ahead and hit the "D" key. It sets the background and foreground to white and black, respectively.

-Go to Filter > Render > Clouds. Like that.

-You shouldn't need to, but I'd advise you to go to Filters > Others > Offset... . Play around with the sliders. Do any seams appear? No? Perfect, you can hit cancel. (Make sure you have "Preview" checked!)
-Hit Render > Difference Clouds either once or thrice. It depends on your personnal preferences. With three times, the clouds will appear a little sharper. I used three. If you feel there are too many white "strings" or "loops", you can always undo (Ctrl-Alt-Z) to render difference clouds again. If you have no idea of what I mean by that, just follow on and ignore.

-Doesn't look to good eh? Don't worry, we shall fix this. Go to Image > Adjustements > Levels... . That function puts more emphasis on the either the black, grey, or white part of the image. Just play with the sliders, you'll understand in a second if you didn't already do. Now, move the black arrow rightwards and same for the grey one, but a little less.

-Those are my configuration. It's really up to you to get what you like though. In short, the black arrow determines the amount of clouds and the grey one, the sharpness of them. You do not need to touch the white one. Here's another possible configuration.

-So then, press OK (obviously). There you go, you have it! Or not, one last thing. Go to Image > Image Size... And shrink your image by half on both width and length (50%). Why you may ask? Cause it's just clouds, you don't need it to be very high resolution. Some blurry shadow overtop of your head (or character) is enough. But then, why not have a smaller size to begin with? Remember, the higher the size, the more clouds are rendered, and you want diversity as much as possible (at least, I do).
-Now just save your file in JPG format, and there you have it!
-Now once on RMXP, have the following settings. You may adjust opacity depending on how dark you want the cloud shadows to be. You may have movement or not at all. Zoom it since real clouds are kinda big.

-So there you go! Adjust screen tones if needed.

And if you don't have photoshop, don't be sad, I have made those two for you ^^.
This and this
And remember, you don't need to follow this tutorial exactly as it is, try experimenting with your own settings!
