
Events
Ah, so you’ve a desire to learn how to make things work, eh? How to make your brave hero complete a puzzle or simply talk to an NPC? Well, you’ve come to the right place – sort of. Since this is in the Beginner’s Lounge I’m assuming that you’re a beginner, or that you want to have a closer look at the stuff you might have glossed over when you yourself were once a beginner. Either way, this guide will focus almost exclusively on only the most simple commands – the necessities to make your game work in the most basic form. I will go over all the commands available to you, but I won’t explain the more difficult ones in depth. There are plenty of tutorials available that explain those.
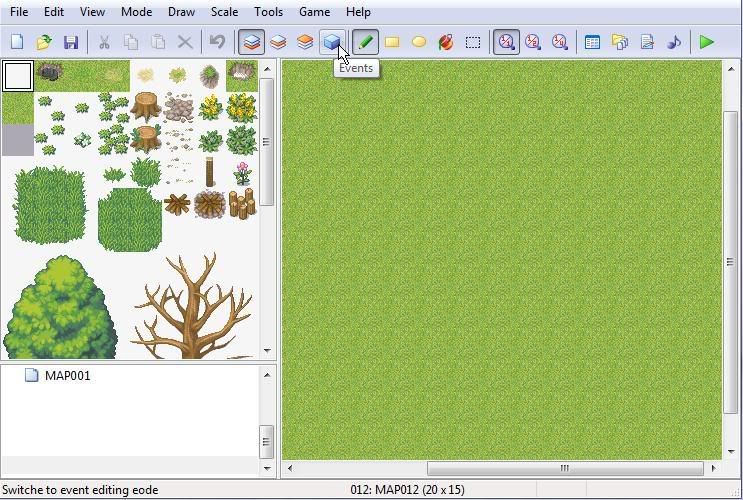
Let’s start with the event box itself. Next to the Layer buttons in the upper-middle area of your editor window you’ll find a button labeled “events.” Click it. You are now prepared to make an event.
Double-click or right-click on the map to create a new event. It will automatically bring up a new window, the Event window. Let’s just explore the window itself for now.
In the very upper left corner, you’ll see “New Event – ID: ###.” If this is your first event, it will be event ID 001. Directly below that is an input area. It’s a good idea to get into the habit of labeling your events, especially once you start getting into bigger maps.
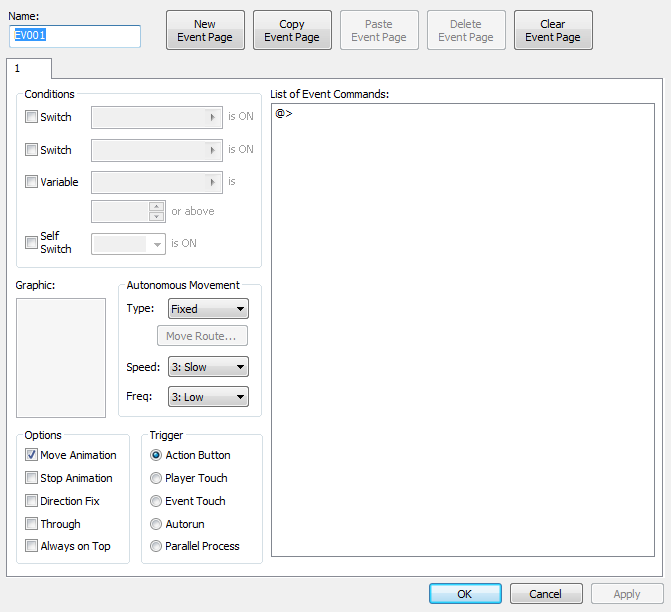
Next to the input area you’ll see five buttons: New Event Page is to create another page in the event (useful for switches), Copy Event Page is to copy what you have on the current page (useful for variables and conditional branches), Paste Event Page, Delete Event Page, and Clear Event Page, obviously to clear whatever you have on the current page.
On the left-hand side of the window is a box with many commands. Don’t let this scare you – it’s both very easy and very essential to learn what the commands on this side do. The topmost box is labeled “Conditions.” This is what, if anything, needs to happen before the current event page can occur. You can have up to two outside switches, one self-switch, and one variable happen before the action in the current event. Generally, however, one is sufficient.
A Self-Switch is used within a single event to link pages together. Say there’s a door: One event page will open it; you’ll need a self-switch to create another page which allows the character to actually pass through it, as well as closing it on command.
Below the Conditions box you’ll see an empty area labeled “Graphic.” Double clicking this box allows you to choose what, if any, sprite sheet you want to use for the event.
Next to that is “Autonomous Movement.” Now what does that mean? This is very important! This allows your NPCs to wander about autonomously, your pirates to pace, your bunnies to scamper. There is a drop-down selector labeled “Type”: if you select Fixed, your event will stay in one place. You’ll probably want to use this for events that change screen tone, track variables, et cetera. Random will allow the character to move wherever the processor feels like it. You might want to use this within houses and shops and basically with any NPC that you don’t terribly care where they go. Selecting Approach will make the NPC approach and hound your hero. Custom is a different animal – you’ll be able to create, and loop, a custom movement for your event. So if you want your pirate to pace, this is the option you’ll want to choose. Create the Move Route by clicking the button right below the drop-down menu.
Below that you’ll find two more drop-down lists labeled Speed and Frequency. Speed, of course, is how fast your character will go, but what is Frequency all about? That’s how often your character will actually move. A higher frequency will produce more fluid movement. Having a high speed and frequency, I’ve found, is the best choice for moving things like fountains. But be careful! Fountains (and things) will look VERY STRANGE if you give them autonomous movement! They’ll be moving all over the place!
Now turn your attention to the lower left, below the Graphic box. You’re looking at the Options menu, and this is quite possibly the most important thing found here! Now, look through the list. Move Animation is obvious enough – it tells the processor that whenever your event moves to the left or right or up or down or sideways or backways or anything that it is supposed to use frames of animation so it looks like it’s actually walking and not sliding all over the place. By unchecking this, your event will, as stated, move around like a block of ice. It’s useful for crate-pushing puzzles.
Stop Animation confuses a lot of people. It does NOT prevent movement from happening – as stated, you do that by unchecking Move Animation. Stop Animation, on the other hand, tells the processor to animate your event when it’s not moving. This is what you’ll want to check for fountains, and it will create Chrono Trigger-like movement in NPCs.
Direction Fix tells the processor that your event is not to be able to turn. You’ll want to check this for things like signs – otherwise, trying to interact with it will cause it to “turn” to you, and change graphics.
Through makes your event walk-through-able. Use this for open doorways, rainbows, light effects, stuff like that. Note that if a Through event is over an impassable tile, it will still be impassable. Events cannot walk across each other unless one is Through.
Always on Top puts your event on a higher plane than your character – your character will appear to walk under or behind it. Events are stacked based on ID number, though Always on Top takes priority.
Next to that you’ll see a box labeled “Trigger.” This is what makes the event actually start. By making the trigger Action Button, you’ll start the event by go up to the event and pressing Enter or V. Player Touch starts the event when you walk your Hero into the event, and Event Touch, nearly the same thing, makes it start when the event makes contact with the player (such as when an enemy chases and catches you). Autorun tells the processor to start it automatically, but be careful – if you don’t add a self-switch or “Erase Event[/i] to the end of whatever you’re trying to do, it will freeze your game! Parallel Process is almost the same as Autorun, but it taxes the game more as it will automatically cycle itself. Don’t use this for things you want to automatically happen once.
Obviously the only thing left in the window is your List of Event Commands. It’s currently big and white and barren, eh? But once you really start eventing, that window will fill up pretty fast. Double click in that field and you’ll bring up a new, smaller window.
Woo. Three full pages of commands. Let’s take this one at a time, shall we? I’ll just make a list. Items that are bolded are items that you should really learn how to use; others are for more specific usage and possibly not noob-friendly.
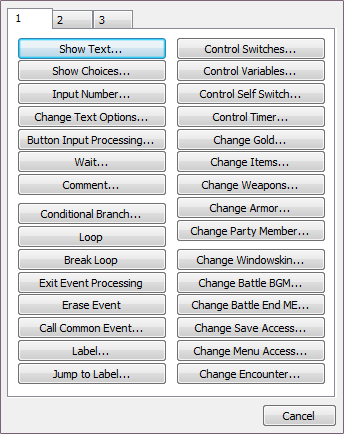
Show Text – Show text, AKA make characters talk, tell the player what an object is, etc. Best used with Action Button, excepting cut scenes.
Show Choices – Pretty self-explanatory, I think. Make a list of up to four choices for the player to choose from. For more choices, make the 4th choice “More…” and for the action, make another Show Choices command.
Input Number – Allows the player to input a number (how much gold would you like to donate?) into a variable.
Change Text Options – Useful for cut scenes. Get rid of the message box, move text up or down, etc.
Button Input Processing – Useful for puzzles, it takes the next button pressed and sets the value to a variable. For the specific values of each button, use the ? feature.
Wait – Wait a set number of frames for something to happen – a song to play, a cut scene to end, etc. Most often, forgetting this command is the cause of events not working correctly. This is in frames (there are 20 frames per second).
Comment – Lines of text for personal benefit (the computer will skip these commands). Use in tandem with scripts, or just to remind yourself what the event does.
Conditional Branch – “If: this, then: that.” Say you want something to happen, such as a change in maps, if a character hits the event at a certain position. You would use a conditional branch. If: Hero is facing: down, then: Transfer Player to Map. There are countless conditions to explore (switches, variables, key item in inventory, state, etc.) and make use of the "Else" branch too.
Loop – Causes a portion of the event to be run repeatedly.
Break Loop – Pretty self explanatory. Stops whatever loop you had previously set after some occurance (like a Wait command, a switch, etc.)
Exit Event Processing Quits running the event (all commands after will be skipped, but the event can still be triggered again).
Erase Event – Very, VERY useful when using Autorun as a trigger. Say you want an NPC to talk to you, then walk off the screen. Do the Text processing, then have them walk however many steps to the door. After that, put in the Erase Event, and the character is gone, everything runs normal. *Note: An event using this will come back if you go back to the same map. If you don’t want this to happen, then either use a switch or a different map.
Call Common Event – Once you make common events (such as dash, door opening sequence, etc), use this to call it.
Label - Create a label. Put this BEFORE some amount of code, such as an NPC’s important dialogue ala Zelda. “Blah blah blah blah. Do you want me to repeat?” This way you don’t have to waste self switches and you don’t have to type long passages over and over. You’ll use the next button to actually make it work.
Jump to Label – Once you’ve made your label, use this to go back up to it. So after your NPC gives their lengthy dialogue about why you’re here and they ask whether you want to repeat, put this command under “Yes.”
Control Switches – Use this to create an outside switch. A Switch connects two objects that otherwise wouldn’t be able to interact with each other. So, if you want an NPC to give you gold *after* you’ve saved her father, and not at any other time, use a switch. Actually, use 2 – “Saved Father” and “Got Gold.” That way she won’t give you gold twice, either.
Control Variables – Create a variable. I can’t speak much about them, since I haven’t really been able to use them past very basic stuff, but essentially you’ll use variables to do things like give a game over or start a cut-scene if, say, a timer runs down to zero.
Control Self Switch – Use this to create a switch that ONLY operates within the event. It links pages of the event together. So, you have a chest: Page one will be the chest closed, and if you go up to it and press the action button, it will open and give you gold. Use a self switch and a new page to create an open chest that won’t give you any gold (because it’s empty now!)
Control Timer – Start or stop the timer and set the time limit. Protip: A minute in-game is generally a lot longer than you think.
Change Gold – Use Increase for when your NPC gives you gold, and Decrease if you give someone else gold (outside of a formal shop). This counts for chests and battles as well. Also works if you “find” gold.
Change Items - Same as gold, but with items.
Change Weapons – “”
Change Armor – “”
Change Party Members – This screws a lot of people up. You HAVE TO HAVE YOUR FINAL PARTY NUMBER SET IN THE DATABASE FIRST. You can’t just add people with this command as you see fit. You can alter your initial party in the System tab of the database, but you must have your final amount set in the Actors tab. So use this when your perky catgirl suggests she join your party. Also, uncheck "Initialize" if a party member is returning, so they don't lose their experience and equipment!
Change Windowskin – Best use for this, I reckon, is a designated area, either at the beginning of the game or elsewhere, that lets the player choose the windowskin they like best. Obviously, you have to have more than one windowskin in the database to make use of this.
Change Battle BGM – You set the battle music that you want for every battle; however, for boss battles or “special” battles you might not want the same humdrum battle music. Use this to change it before battle processing.
Change End Battle ME – Change the fanfare bit that plays at the end of the battle.
Change Save Access – Sometimes there are places that you don’t want your player to be able to save. For games with world maps, it’s generally anywhere inside, or where there’s not a designated “save point”; sometimes, however, you just don’t want them to be able to save anywhere in the Evil Castle of Ultimate Doom, except, perhaps, a single save point. Use this to change saveability.
Change Menu Access - Important cut-scene and you don’t want the player screwing it up by opening the menu? Game that doesn’t USE the menu? Use this to turn it on/off.
Change Encounter – Toggles on/off the random encounters specified in the Map Settings.
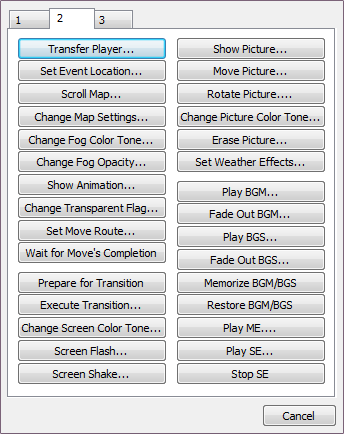
Transfer Player – Take player from here and put them there. This is how you get your character to enter houses, castles, new areas, etc. I’ve found it works best in tandem with the Conditional Branch command and Player Touch trigger.
Set Event Location – Like Transfer Player, but with events. Take event from here and place it there. Terribly useful when you want one event to be on the same spot as another event, as you can’t manually place them both there.
Scroll Map – Useful for cut-scenes and to show just how huge that grand castle is.
Change Map Settings – In the database, all three of the choices available will already be set. You can use this to change them to whatever - whatever panorama (background), fog, or battleback you please.
Change Fog Color Tone – Does what it says, but I’ll warn you: Most fogs are black and white. They don’t change color.
Change Fog Opacity – Make the fog thicken up just in time for that important battle, and thin it out afterwards.
Show Animation – No, this isn’t the same thing as making fountains move. This uses the animations available for battles and shows them on the screen. This is how characters get the ! above their heads.
Change Transparent Flag – Change whether the player is visibly displayed; ie, make him invisible for important bits.
Set Move Route – Set a specific move route for an event. The fun part about this is that you can set the move route for any event that you’ve already made; by default, though, its set at Player, so make sure you set it to what event you want.
Wait for Move’s Completion – Fairly obvious, I should think. Wait until your character is done walking 3 steps to the left and down one for anything else to happen.
Prepare for Transition – Prepares the screen for a transition. All screen drawing is halted until Execute Transition is called. Use map transfers, screentone changes, etc. between these two commands.
Execute Transition – It’s generally a fade out. Useful for flashbacks, stuff like that.
Change Screen Color Tone– Change the color of your map. This command is excellent for setting mood – make your deserts bright and blaring, your forests dark and soggy, your swamp toxic and your indoors warm.
Screen Flash – Flashes only once, but how long the flash takes is up to you. You can also choose the color – but by default, it’s white. Another bit useful for cut-scenes.
Screen Shake - Makes the screen appear to shake. Choose the power and speed as well as how long it’ll last.
Show Picture – Show a picture on the screen. This can be anything from a simple picture (like a map) to integrating it as part of the map itself.
Move Picture – Move the picture around the screen.
Rotate Picture - Rotate whatever pic’s on your screen. Might be useful for puzzles!
Change Picture’s Color Tone - Change ONLY the color tone of the picture. Won’t work for the rest of the screen.
Erase Picture – Get rid of the picture that you put up there with Show Picture.
Set Weather Effects – Make it snow! Make it rain! Storms! Woooooooooooo! Only thing you can’t do is wind – you’ll have to do that with the fog.
Set BGM (Background Music) – So you’ve already got the pretty adventure-y music on your map, but something happens! The villain makes his grand appearance, or a giant earthquake happens! Use this to change the music to fit the mood.
Fade Out BGM (Background Music) – Fade out the background music. Works for whatever you’ve already got on the map as well as whatever you decide to change it to.
Play BGS(Background Sound) – This is how you get the caves dripping, the wind howling, etc.
Memorize BGM/BGS – Remember what sounds are playing before you muck around with them, so they can be recalled.
Restore BGM/BGS – Restore it to whatever it was before you changed it. Only works if you Memorize’d them first!
Play ME (Music Effect) – Play a music effect, like fanfare or the “sleep music” for inns.
Play SE (Sound Effect) – Play a sound effect, like clapping, booing, cheering, an animal sound, etc. To make cows moo, put this in the Command area of a cow event, triggered by the action button.
Stop SE – Stop the sound effect.
Page three is basically completely reserved for battle and shop processing.
Battle Processing – Start a battle. Choose what troop to fight (set in the database), whether you can run or not, and if you can continue even if you lose.
Shop Processing – Start shopping. You can choose what the shop sells, but you have to set the prices of each item in the database.
Name Input Processing – Let the player pick the name of the Hero or party members. Use \N